

💡 L R N - Learn to Earn! Learn skills and earn NFTs 🏆✨
Create and take part in Learn to Earn courses and get rewarded with utility NFTs!


✨ About the app
L R N is a webApp that lets users create amazing Learn to Earn courses that rewards users with unique utility NFTs.
Create modules and add Text, Images, videos, and code embeddings as content.
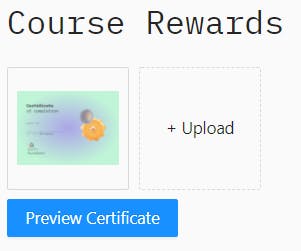
Users can download certificates on completion of the course and share it as their proof of learning.
💻 Demo of the app
Check out the deployed project and Github repo
🔧 Building the app
- Authentication using firebase
- Configuring Quill.js to support rich text in modules
- Setting up AntDesign widgets
- Generating custom certificates and downloading
- Deploying to Netlify
🔑🔒 Authentication using Firebase
- Install the firebase NPM package
npm install firebase
Get the
firebaseConfigfrom the firebase console after creating a firebase appEnable the Email/Password signIn method in the authentications tab
Return a
user contextprovider
export function UserAuthContextProvider({ children }) {
  const [user, setUser] = useState("");
  async function signUp(email, password) {
    const { user } = await createUserWithEmailAndPassword(auth, email, password);
  }

  function login(email, password) {
    return signInWithEmailAndPassword(auth, email, password);
  }

  function logout() {
    return signOut(auth);
  }

  return (
    <userAuthContext.Provider
      value={{ user, signUp, login, logout, googleLogIn }}
    >
      {children}
    </userAuthContext.Provider>
  );
}
✎ Configuring Quill.js rich text editor
- Install the
react-quillnpm package
npm install react-quill
import the
'react-quill/dist/quill.snow.css'file in the componentConfigure the custom modules and options in the toolbar
 const modules = {
    toolbar: [
      [{ header: "1" }, { header: "2" }, { font: [] }],
      [{ size: [] }],
      ["bold", "italic", "underline", "strike", "blockquote"],
      [
        { list: "ordered" },
        { list: "bullet" },
        { indent: "-1" },
        { indent: "+1" },
      ],
      ["link", "image", "video"],
      ['clean'],
    ],
    clipboard: {
      matchVisual: false,
    }
- Render the ReactQuill component with the custom props
<ReactQuill
        ref={editorRef}
        theme="snow"
        value={value}
        onChange={setValue}
        modules={modules}
      />
⚙️Setting up AntDesign
- Install the AntDesign npm package
npm install antd
Add
'import 'antd/dist/antd.css';'in the root file.Lets configure the upload widget
Install the
antd-img-croppackage to add a cropping functionalityRender the
ImgCropcomponent with custom props
const onPreview = async file => {
    let src = file.url;
    if (!src) {
      src = await new Promise(resolve => {
        const reader = new FileReader();
        reader.readAsDataURL(file.originFileObj);
        reader.onload = () => resolve(reader.result);
      });
    }
    const image = new Image();
    image.src = src;
    const imgWindow = window.open(src);
    imgWindow.document.write(image.outerHTML);
  };

  return (
    <ImgCrop rotate>
      <Upload
        listType="picture-card"
        fileList={fileList}
        onChange={onChange}
        onPreview={onPreview}
      >
        {fileList.length < 5 && '+ Upload'}
      </Upload>
    </ImgCrop>
  );
🏅 Generating custom certificates and downloading
- Render the certificate template using a
imgtag. - Add a input field to get name and render it in a
divtag over the template.
<div ref={captureRef} className="certificate-div">
          <img
            src={CertificateImage}
            className="certificate-img"
            alt="certificate"
            srcset=""
          />
          <div className="certificate-name">{name}</div>
</div>

          <input
            type="text"
            placeholder="Enter name for certificate"
            onChange={(e) => {
              SetName(e.target.value);
            }}
          />
Install the
downloadjsandhtml-to-imagepackage to convert the component to image.Create a screenShot script that captures a ref and converts it to a PNG
function useScreenshot() {
  const captureRef = React.useRef();

  const [status, setStatus] = React.useState("idle");

  async function generateImage(e) {
    e.preventDefault();
    if (!captureRef?.current) {
      return;
    }
    try {
      setStatus("loading");
      const imgBase64 = await toPng(captureRef.current, {
        quality: 1,
        pixelRatio: 1,
      });
      setStatus("success");
      download(imgBase64, "certificate.png");
    } catch (error) {
      setStatus("error");
      console.error(error);
    }
  }

  return {generateImage, captureRef, status};
}
🚀 Deploying to Netlify
- Push the code to a Github Repository
- Go to app.netlify.com
- Select the
New site from Gitoption. - Select the Git repository from the dropdown.
- Click on the
Deploybutton.
💫 Conclusion
This is how 💡 L R N was built! It was a wonderful experience, I would like to thank Hashnode and Netlify for organizing this hackathon.